

Debossing is a printing and finishing technique that presses a design, logo, text, or artwork into a material’s surface. Instead of raising the design, debossing creates a recessed or sunken effect.
You may have seen debossing on business cards, book covers, luxury packaging, leather products, and rigid boxes. When you run your fingers over the design, you can feel that the selected area sits below the surrounding surface.
Debossing is commonly used to make logos and important design elements more noticeable without relying heavily on ink or printed graphics.
In this guide, we will explain how debossing works, why it matters, when to use it, and how it compares with embossing.
Why Does Debossing Matter?
Debossing matters because it adds both visual and physical detail to packaging and printed products. A flat printed logo may attract attention through color, while a debossed logo adds texture that customers can also feel.
This finishing technique can help with:
- Improving Logo Presentation: A recessed logo can appear clean, professional, and noticeable.
- Adding Texture: Debossing creates a tactile surface that customers can feel with their hands.
- Creating Visual Depth: The pressed design adds dimension instead of leaving the surface completely flat.
- Supporting Minimal Designs: Debossing works well when you want simple packaging without excessive graphics.
- Improving Product Presentation: It can make custom boxes, cards, covers, and other printed items appear more refined.
You can also combine debossing with printing or foil stamping when a design needs stronger contrast.
The Process of Debossing
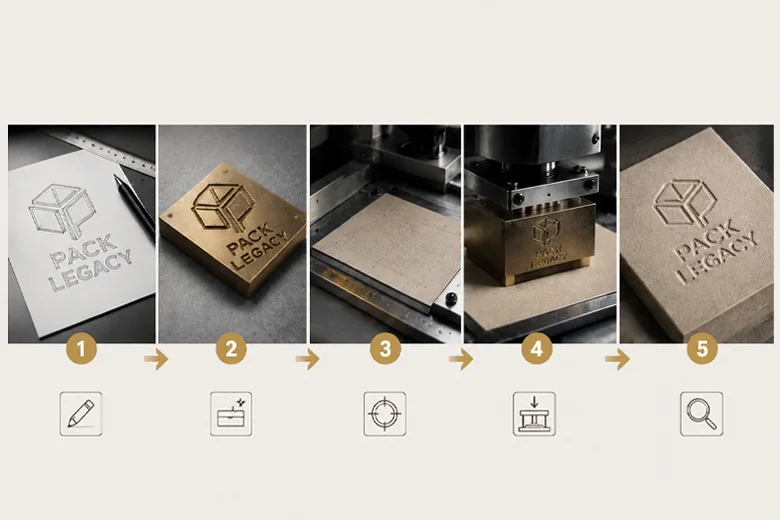
The debossing process involves pressing a custom-made die into the material’s surface. Pressure, and sometimes heat, is applied to create a permanent recessed impression.
Here is how the process generally works:
1. Preparing the Artwork
The process starts with selecting the design that needs to be debossed. It can be a logo, pattern, text, symbol, or another important part of the artwork.
Simple designs with clear lines usually produce better results.
2. Creating the Die
A custom die is then manufactured according to the selected artwork. The die contains the shape or pattern that will be pressed into the surface.
The depth and details are carefully prepared to achieve the desired final effect.
3. Positioning the Material
The material is placed inside the press and properly aligned with the die. Correct positioning matters because even a small alignment error can affect the final design’s appearance.
4. Applying Pressure
The die is pressed into the surface using controlled pressure. This force pushes the selected area downward and creates the recessed effect.
The amount of pressure depends on the material’s thickness and characteristics.
5. Inspecting the Finished Surface
Once the pressing process is complete, inspect the finished piece for depth, alignment, and overall appearance.
The result is a permanent impression you can see and feel.
When To Use Debossing?
Debossing is useful when you want to highlight specific elements without making the overall design look too busy.
You can consider debossing when:
- You want your logo to stand out through texture.
- Your packaging follows a clean or minimal design.
- You want customers to physically feel part of your branding.
- You are designing premium product packaging.
- You want to highlight brand names, patterns, or short text.
- You want an alternative to standard printed graphics.
- Your design already includes foil stamping or other decorative finishes.
Debossing works particularly well on packaging where customers directly interact with the surface. For example, placing a debossed logo on the lid of a rigid box lets customers see and feel the branding as they open the package.
However, very small text or extremely detailed artwork may not always produce a clear debossed impression. Review the artwork before production.
Embossing Or Debossing: Which One Is Better?
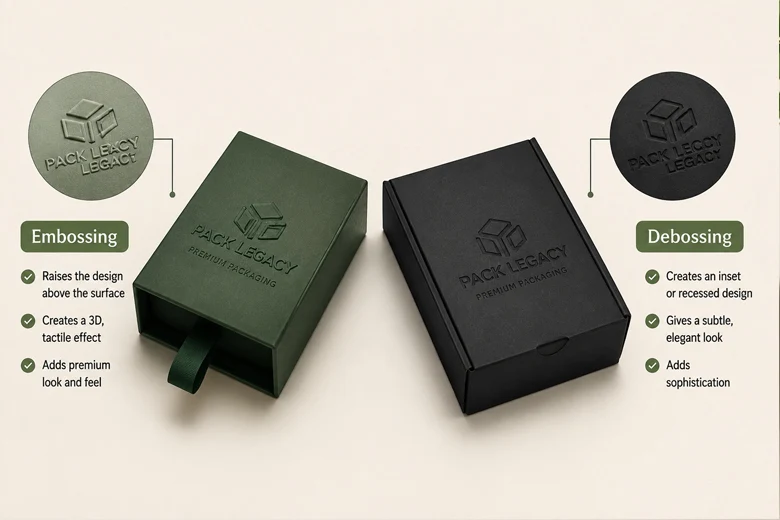
Embossing and debossing are closely related techniques, but they create opposite effects.
Embossing raises the selected artwork above the surface, while debossing presses the artwork into the surface.
Neither option is automatically better. The right choice depends on the appearance you want to achieve.
Choose embossing when:
- You want the design to stand out physically.
- Your logo needs more visual prominence.
- You want a noticeable three-dimensional effect.
- The raised texture complements your packaging design.
Choose debossing when:
- You want a recessed and subtle design.
- Your packaging follows a minimal appearance.
- You want to create depth without raising the surface.
- You prefer understated branding.
For example, an embossed logo may immediately catch the eye because it rises above the surface. A debossed logo can create a more subtle impression while still adding noticeable texture.
You can also combine both techniques with foil stamping or printing to increase contrast and make specific design elements more prominent.
You can also read our detailed guide on “what is embossing” to learn more about the embossing technique.
Conclusion
Debossing is an effective finishing technique for creating recessed designs on packaging and printed materials. It adds texture, depth, and a noticeable physical element to logos and artwork. Whether you choose debossing or embossing depends on the effect you want. Debossing works especially well when your design requires a clean, subtle, and tactile finish.